Volume service
Volumes are persistent block storage devices that can be attached to instances. Unlike ephemeral storage that is tied to the instance lifecycle, volumes exist independently and persist even when instances are deleted. This makes them suitable for boot disks, databases, and any data that should outlive a specific instance.
This page includes OpenStack CLI commands. See the API Access documentation for instructions on how to install and configure the command line client.
Boot storage options
When launching an instance you choose where the root disk lives. There are two options:
Ephemeral storage — the root disk is stored on the compute node's local disk and is tied to the instance lifecycle. It is automatically deleted when the instance is deleted. This is suitable for stateless instances or short-lived workloads where no persistent state is kept on the root disk.
To boot from image with ephemeral storage, set Select Boot Source to Image in the Launch Instance wizard and set Create New Volume to No. Pick a flavor starting with l2, which includes local storage.
Volume-backed boot — the root disk is a persistent volume in the central storage. It survives instance deletion and can be used to recreate the instance later. This is the recommended option for most workloads.
There are two ways to launch a volume-backed instance:
Option 1 — create the volume first:
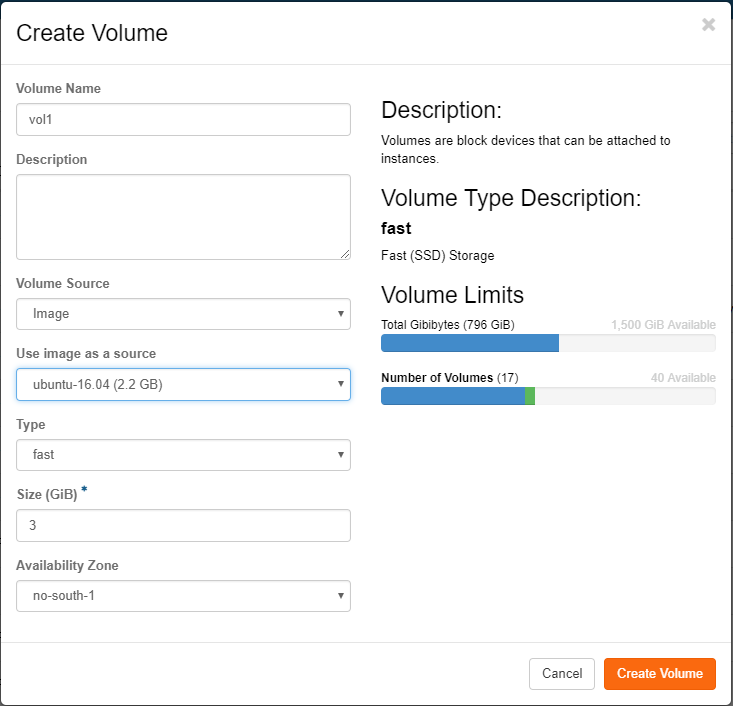
- Go to Volumes and click Create Volume.
- Set Volume Source to Image and select your OS image.
- Set the volume type to fast (recommended for boot disks) and set the size.
- Click Create Volume, then select Launch as Instance from the volume's dropdown menu.
Option 2 — let the wizard create the volume:
In the Launch Instance wizard, set Select Boot Source to Image, set Create New Volume to Yes, and set Delete Volume on Instance Delete to No. The volume is created automatically when the instance launches.
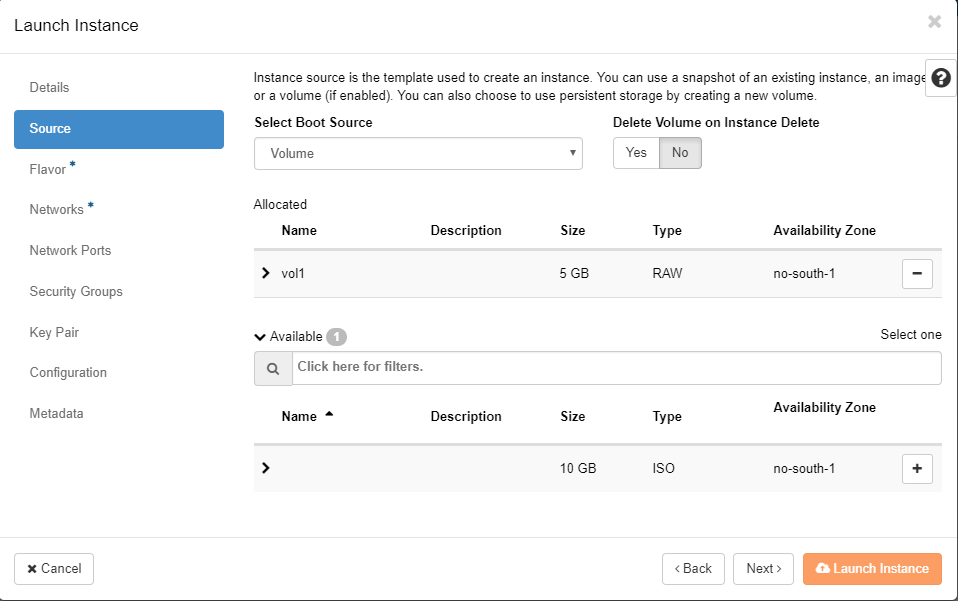
In both cases, pick a flavor starting with b2 under the Flavor tab — these flavors have no local disk, since the root disk is already covered by the volume.
Volume types
Safespring Compute offers two volume types:
| Type | Use case | Read IOPS per GB | Write IOPS per GB | IOPS range |
|---|---|---|---|---|
| fast | Boot disks, databases, applications with high I/O requirements | 100 | 50 | Up to 100000 read / 50000 write |
| large | Data archives, log storage, backups, infrequently accessed data | 2 | 2 | 50–4000 read / 50–4000 write |
For example, a 10 GB fast volume provides 1000 read and 500 write IOPS, while a 100 GB large volume provides 200 read and 200 write IOPS.
Info
IOPS limits apply to all mounted volumes on an instance, not just boot drives. Keep this in mind when attaching additional volumes.
It is recommended to use fast for boot volumes since a large boot volume will make the instance noticeably slower. See the Flavors documentation for more details on IOPS per volume type.
Creating a volume
Using the Horizon dashboard
- Navigate to Volumes and click Create Volume.
- Give the volume a name.
- Under Volume Source, select Image if you want to create a bootable volume, or No source, empty volume for a data volume.
- Select the volume type: fast or large.
- Set the size in GB. If you selected an image as source, the minimum size is pre-filled.
- Click Create Volume.
Using the CLI
Create an empty volume:
openstack volume create --size 20 --type fast my-data-volume
Create a bootable volume from an image:
openstack volume create --size 20 --type fast --image ubuntu-24.04 my-boot-volume
Attaching a volume to an instance
Using the Horizon dashboard
In the Volumes listing, select Manage Attachments from the dropdown menu on the volume. Select the instance you want to attach it to and click Attach Volume.
Using the CLI
openstack server add volume my-instance my-data-volume
After attaching, the volume appears as a new block device inside the instance (for example /dev/sdb). You need to format and mount it before use:
# Identify the new device
lsblk

# Create a filesystem (only for new empty volumes)
mkfs.ext4 /dev/sdb

# Mount it
mkdir -p /mnt/data
mount /dev/sdb /mnt/data
Detaching a volume from an instance
Warning
Always unmount the volume from within the instance before detaching it. Detaching without unmounting causes a hard disconnect from the I/O subsystem, which risks data loss.
# Inside the instance
umount /mnt/data
Then detach the volume:
Using the Horizon dashboard
In the Volumes listing, select Manage Attachments from the dropdown menu and click Detach Volume.
Using the CLI
openstack server remove volume my-instance my-data-volume
Extending a volume
You can increase the size of an existing volume. The volume must be detached from any instance before extending.
Using the Horizon dashboard
In the Volumes listing, select Extend Volume from the dropdown menu and enter the new size.
Using the CLI
openstack volume set --size 50 my-data-volume
After extending and reattaching the volume to an instance, you also need to resize the filesystem inside the instance to use the new space:
# For ext4 filesystems
resize2fs /dev/sdb

# For XFS filesystems
xfs_growfs /mnt/data
Deleting a volume
A volume must be detached before it can be deleted.
Using the Horizon dashboard
In the Volumes listing, select Delete Volume from the dropdown menu.
Using the CLI
openstack volume delete my-data-volume
Note
Snapshots taken from a volume are independent and will remain even after the volume is deleted. These snapshots continue to consume storage quota. See the Snapshots HOWTO for details on managing snapshots.
Changing volume type
It is possible to migrate between the fast and large volume types using the API or the UI.
Prerequisites
- The volume has to be detached from any instance for the migration to work.
Please make sure to unmount the volume from within the instance before detaching it. The volume will be detached from the I/O subsystem of your instance, so not removing it properly could cause a "hard" disconnect, with risk of data loss.
Migrating using the UI
-
Find the correct volume using the Volumes tab of your compute project.
-
Select
Change Volume Typein the pulldown menu for the volume you want to migrate.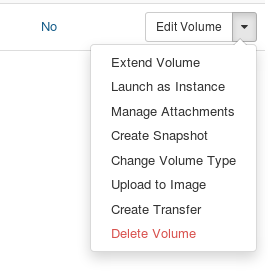
-
Select the new volume type from the pulldown list
-
Set
Migration policytoOn demand -
Click
Change Volume Type
The volume service will now copy the volume from the old backend to the new. Depending on the size of the volume, this operation will take some time.