The Cloutility REST API
The Cloutility portal has a REST API that can be used to programmatically perform Create, Retrieve, Update and Delete (CRUD) operations with various resources.
This document describes how you can manage several resource types on your account, including Consumption Units and Backup Nodes. This will lay the foundation for understanding how to manage other resource types in Cloutility.
Before talking about these features, we need to understand how authentication on Cloutility works. In other words, how do you "log in"?
Authentication
Cloutility authentication & authorization is based on the OAuth v2 protocol. The way this works is by requesting an access token that corresponds to our user account. Once we have this access token, we can perform any operations that our account has permissions to do!
An overview of the steps:
- Use Cloutility to generate a client ID for your origin URL (such as "https://service.yourcompany.com").
- Ask Cloutility for a seemingly random string called an "access token" by giving it the client ID, origin, your username and your password.
- Use the access token and the origin to perform operations, like creating backup nodes or retrieving a list of all users, for example.
Generating a Client ID
To get access tokens, you need a client ID. This client ID identifies your program. It can be generated in the Cloutility portal by clicking on Settings (cogwheel in the top-right corner) → API access → Add. You will be asked to provide an app name, an origin and a choice whether to allow token refreshing or not. The origin should be a URL, this is relevant because the origin must be sent with every API call, or else the call will fail.
This step should only be done once for every app you have that utilizes the API. Once you have a client ID, it can be embedded into the app and reused.
Requesting an Access Token
Requesting an access token is done using the following HTTP route.
[POST] /v1/oauth
- Request Headers:
    * Origin: {client_origin}
- Request Body: PasswordGrant
- Response Body: AccessToken
The structure of the PasswordGrant HTTP request body is described below.
client_id={client_id}
&grant_type=password
&username={username}
&password={password}
The grant_type should always be the same. It should be set to the "password" OAuth2 Grant Type. You have to specify the client_id, username and the password.
Once you have made the HTTP request, you should get an HTTP response with an AccessToken body. Its structure is as follows.
{
  "access_token": "{access_token}",
  "token_type": "bearer",
  "expires_in": 299,
  "refresh_token": "{refresh_token}"
}
Do you see access_token above? That is what you want.
The token_type is always the same, it can be ignored. The expires_in tells us when the access token expires, in Cloutility it is always ~5 minutes. In most situations this should give us plenty of time to execute a program that uses the API. If we need more time, we can use the refresh_token to generate a new access token. How this is done is described under the Refreshing an Access Token section.
How to Use an Access Token
Let us take the GET /v1/fullVersion API endpoint as an example. It is
used
to get the full version of the Cloutility API.
[GET] /v1/fullVersion
- Request Headers:
    * Authorization: Bearer {access_token}
    * Origin: {client_origin}
- Response Body: string
The response should be something like:
"1.0.4480.0"
Refreshing an Access Token
If you do not need an access token for longer than 5 minutes, then you may
ignore this section. If you do, then make an HTTP POST request to
/v1/oauth as you did before, but as an authenticated user, and instead send a
RefreshTokenGrant request body. The body structure is as follows.
client_id={client_id}
&grant_type=refresh_token
&refresh_token={your_refresh_token}
The placeholder your_refresh_token is replaced with the refresh token that you got when you first authenticated yourself, see AccessToken in the Requesting an Access Token section above. This refresh token will stay the same.
Full Python Example Program
In this example we authenticate, and then call the /v1/fullVersion using
the requests module. To install this module, run python3 -m pip install
requests.
import requests

# Change these
USERNAME = "cloutility username"
PASSWORD = "cloutility password"
CLIENT_ID = "your client ID"
CLIENT_ORIGIN = "your client origin"

# Do not change this
CLOUTILITY_API_URL = "https://portal-api.backup.sto2.safedc.net/v1/"

# Step 1: Get an access token
response = requests.post(
    url=CLOUTILITY_API_URL + "oauth",
    headers={
        "Origin": CLIENT_ORIGIN
    },
    data={
        "client_id": CLIENT_ID,
        "grant_type": "password",
        "username": USERNAME,
        "password": PASSWORD
    }
)

if response.status_code == 200:
    response_body = response.json()
    access_token = response_body["access_token"]
    refresh_token = response_body["refresh_token"]
    expires_in = response_body["expires_in"]
    print(f"Got access token! Expires in {expires_in} seconds.")
else:
    print("Authentication failed.")
    exit(1)

# Step 2: Make an API call
response = requests.get(
    url=CLOUTILITY_API_URL + "fullVersion",
    headers={
        "Authorization": "Bearer " + access_token,
        "Origin": CLIENT_ORIGIN
    }
)

if response.status_code == 200:
    print("API call successful!")
    print("API full version is:", response.json())
else:
    print("Failed to perform API call.")
    exit(1)

# Step 3: You can reuse the same access_token for about 5 minutes...
# If you need to renew the access token, check out step 4.
...

# Step 4: Refresh the access token by using refresh_token
response = requests.post(
    url=CLOUTILITY_API_URL + "oauth",
    headers={
        "Authorization": "Bearer " + access_token,
        "Origin": CLIENT_ORIGIN
    },
    data={
        "client_id": CLIENT_ID,
        "grant_type": "refresh_token",
        "refresh_token": refresh_token
    }
)

if response.status_code == 200:
    response_body = response.json()
    access_token = response_body["access_token"]  # New access token
    expires_in = response_body["expires_in"]
    print(f"Refreshed access token. Expires in {expires_in} seconds.")
else:
    print("Failed to refresh access token.")
    exit(1)
Define the first four constants, and run the program. The output should be something like:
Got access token! Expires in 299 seconds.
API call successful!
API full version is: 1.0.4480.0
Refreshed access token. Expires in 299 seconds.
API Endpoints
The Cloutility REST API is documented here in great detail. We will just cover a few useful endpoints, but you should be aware that there are many more.
For all listed API endpoints, the HTTP request headers Origin and
Authorization are obligatory.
For brevity, these headers will be omitted from the rest of the document.
In other words,
it is implicitly implied that they should be sent with every HTTP request.
Business units
Consumption units (backup nodes) are managed under Business units. Therefore, to create new consumption units, we have to know which business units we have, and more specifically their id numbers.
Below are some endpoints that you can use to find your business units programmatically.
Note
The id numbers in the output example above will be referred to as
{bunitId} in the rest of the document.
You should replace this placeholder with the ID number of the business
unit you intend to operate on.
-
Get detailed information about a single business unit.
Example output[GET] /v1/bunits/{bunitId} - Response Body: BusinessUnit{ "href": "https://portal-api.backup.sto2.safedc.net/v1/bunits/22", "parentBusinessUnit": { "domainFilter": [], "clientOptionSetFilter": [], "name": "Safespring - Sverige", "supportResponsible": false, "registrationNumber": "", "invoiceDay": 0, "billingStorageTypeId": 1, "billingStorageType": 1, "useScheduleBindings": false, "consumers": [], "storageLimit": 0, "transferLimit": 0, "nodeLimit": 0, "passwordExpirationDays": 0, "requiredApproversOfDeleteRequest": 0, "finalDeleteRequestApprover": false, "usersCanApproveOwnRequests": false, "reportRemotely": false, "tags": [], "id": 13, "createdDate": "2022-08-22T15:01:45.027Z" }, "timeZone": { "$type": "CloudPortal.Web.Api.Hyper.TimeZone, CloudPortal.Web.Api", "href": "https://portal-api.backup.sto2.safedc.net/v1/timezones/4", "actions": [ { "name": "Calculate UTC offset", "method": "GET", "href": "https://portal-api.backup.sto2.safedc.net/v1/timezones/4/offset?date" } ], "name": "(GMT+01:00) Amsterdam, Berlin, Bern, Rome, Stockholm, Vienna", "windowsId": "W. Europe Standard Time", "offset": 0, "id": 4, "createdDate": "2022-06-10T06:33:19.337Z" }, "users": { "$type": "CloudPortal.Web.Api.Hyper.Collection`1[[CloudPortal.Web.Api.Hyper.User, CloudPortal.Web.Api]], CloudPortal.Web.Api", "href": "https://portal-api.backup.sto2.safedc.net/v1/bunits/22/users", "total": 0, "items": [] }, "addresses": { "$type": "CloudPortal.Web.Api.Hyper.Collection`1[[CloudPortal.Web.Api.Hyper.Address, CloudPortal.Web.Api]], CloudPortal.Web.Api", "href": "https://portal-api.backup.sto2.safedc.net/v1/bunits/22/addresses", "total": 0, "items": [] }, "businessUnits": { "$type": "CloudPortal.Web.Api.Hyper.Collection`1[[CloudPortal.Web.Api.Hyper.BusinessUnit, CloudPortal.Web.Api]], CloudPortal.Web.Api", "href": "https://portal-api.backup.sto2.safedc.net/v1/bunits/22/bunits", "total": 0, "items": [] }, "domainFilter": [], "clientOptionSetFilter": [], "name": "Company AB", "supportResponsible": false, "registrationNumber": "SE556612345678", "invoiceDay": 0, "billingStorageTypeId": 2, "billingStorageType": 2, "useScheduleBindings": false, "consumers": [], "storageLimit": 0, "transferLimit": 0, "nodeLimit": 0, "passwordExpirationDays": 0, "requiredApproversOfDeleteRequest": 0, "finalDeleteRequestApprover": false, "usersCanApproveOwnRequests": false, "reportRemotely": false, "tags": [], "id": 22, "createdDate": "2023-06-10T11:10:11.321Z" }
-
Get business units directly under a specific business unit.
[GET] /v1/bunits/{bunitId}/bunits
- Response Body: Collection of BusinessUnit
Create a business unit
If you wish to create a business unit, first pick the right time zone using:
[GET] /v1/timezones
- Response Body: TimeZoneList
[GET] /v1/timezones/{timeZoneId}
- Response Body: TimeZone
Then create the business unit with:
[POST] /v1/bunits/{bunitId}/bunits
- Request Body: BusinessUnit
- Response Body: BusinessUnit
The request body can have the following format:
{
  "name": string,
  "registrationNumber": string,
  "timeZone": TimeZone
}
Note that not all fields of the BusinessUnit resource type have to be defined in the request, this is normal.
Modifying business units
If you wish to modify existing business units, use the following endpoint:
[PUT] /v1/bunits/{bunitId}
- Request Body: BusinessUnit
- Response Body: BusinessUnit
Deleting business units
If you wish to delete business units, use the following endpoint:
[DELETE] /v1/bunits/{bunitId}
- Request Body: BusinessUnit
More details
For more details about the objects sent as responses and what the meanings of the fields are, please refer to Cloutility's REST API documentation:
Note
Many times endpoints return incomplete objects, contrary to what the Cloutility documentation may appear to be saying.
This actually saves network bandwidth as the size of these objects along with all their components may be huge. But it can cause confusion to someone that is not used to Cloutility's API.
We recommend that you use the most explicit endpoint for what you want to
retrieve. For example, if you want all users of a Business Unit,
do not use /v1/bunits/{bunitId}, use instead /v1/bunits/{bunitId}/users.
Consumption units
Once you have the ID number (bunitId) of the business unit you wish to
operate under,
you can start managing consumption units for this business unit.
In the Cloutility API, these are referred to as "consumers".
But we will use the term that the web interface uses for consistency,
that is "consumption units".
Retrieving units
Just like with business units, you can retrieve consumption units in an analogous fashion:
[GET] /v1/bunits/{bunitId}/consumers
- Response Body: Collection of Consumer
[GET] /v1/bunits/{bunitId}/consumers/{consumerId}
- Response Body: Consumer
A Consumer (consumption unit) object will have the following structure:
{
  "href": "https://portal-api.backup.sto2.safedc.net/v1/bunits/22/consumers/408",
  "dataSourceType": {
    "id": 1,
    "name": "SP Backup node"
  },
  "dataSourceIsPotentialParent": false,
  "dataSourceState": {
    "id": 3,
    "name": "Active"
  },
  "name": "JennysWS",
  "billingStartDate": "2023-06-09T00:00:00Z",
  "businessUnit": {
    "$type": "CloudPortal.Web.Api.Hyper.BusinessUnit, CloudPortal.Web.Api",
    "href": "https://portal-api.backup.sto2.safedc.net/v1/bunits/22",
    "ancestors": {
      "href": "https://portal-api.backup.sto2.safedc.net/v1/bunits/22/ancestors",
      "total": 0,
      "items": []
    },
    "users": {
      "$type": "CloudPortal.Web.Api.Hyper.Collection`1[[CloudPortal.Web.Api.Hyper.User, CloudPortal.Web.Api]], CloudPortal.Web.Api",
      "href": "https://portal-api.backup.sto2.safedc.net/v1/bunits/22/users",
      "total": 0,
      "items": []
    },
    "addresses": {
      "$type": "CloudPortal.Web.Api.Hyper.Collection`1[[CloudPortal.Web.Api.Hyper.Address, CloudPortal.Web.Api]], CloudPortal.Web.Api",
      "href": "https://portal-api.backup.sto2.safedc.net/v1/bunits/22/addresses",
      "total": 0,
      "items": []
    },
    "businessUnits": {
      "$type": "CloudPortal.Web.Api.Hyper.Collection`1[[CloudPortal.Web.Api.Hyper.BusinessUnit, CloudPortal.Web.Api]], CloudPortal.Web.Api",
      "href": "https://portal-api.backup.sto2.safedc.net/v1/bunits/22/bunits",
      "total": 0,
      "items": []
    },
    "domainFilter": [],
    "clientOptionSetFilter": [],
    "name": "Marketing Department",
    "note": "some note...",
    "supportResponsible": false,
    "registrationNumber": "123456789999",
    "invoiceDay": 0,
    "billingStorageTypeId": 2,
    "billingStorageType": 2,
    "useScheduleBindings": false,
    "consumers": [],
    "storageLimit": 0,
    "transferLimit": 0,
    "nodeLimit": 0,
    "passwordExpirationDays": 0,
    "requiredApproversOfDeleteRequest": 1,
    "finalDeleteRequestApprover": true,
    "usersCanApproveOwnRequests": true,
    "reportRemotely": false,
    "tags": [],
    "id": 22,
    "createdDate": "2023-06-10T11:10:11.321Z"
  },
  "lastCommentTime": "2023-10-20T16:58:26.237Z",
  "lastCommentTypeId": 2,
  "comments": [],
  "note": "Jenny's workstation.",
  "limitHighStorage": 100.0,
  "allowNoActivity": false,
  "tags": [],
  "jobs": [],
  "id": 408,
  "createdDate": "2023-07-09T15:10:20.133Z"
}
As mentioned before, the level of detail varies depending on which endpoint you use. See the note above. It can also depend on which fields you have defined. Sometimes if a field has not been defined yet, it will simply not be a part of the retrieved object at all.
Creating new consumption units
The endpoint used to create new consumption units is:
[POST] /v1/bunits/{bunitId}/consumers
- Request Body: Consumer
- Response Body: Consumer
The absolutely simplest way to create a consumption unit is to just specify its name in the request body.
{
  "name": "LisasWS"
}
Of course, if you want to, more fields are available.
The response, after it has been created, will be a significantly more detailed version of the consumption unit.
Editing consumption units
[PUT] /v1/bunits/{bunitId}/consumers/{consumerId}
- Request Body: Consumer
- Response Body: Consumer
Deleting consumption units
[DELETE] /v1/bunits/{bunitId}/consumers/{consumerId}?deleteAssociations={true/false}&deletionComment={comment}
- Request Body: Consumer
Audit log
To query the audit log, use:
[GET] /v1/bunits/{bunitId}/consumers/{consumerId}/auditlogs?includeDescendants={true/false}&limit={limit}&offset={offset}&orderDesc={true/false}&startTime={start_date}&endTime={end_date}&types=0&types=100&types=200&types=300&types=400
&types=0for info&types=100for create-actions&types=200for modify-actions&types=300for delete-actions&types=400for errors
The query parameters startDate and endDate are optional.
But if you define them, make sure that the values are ISO 8601 formatted.
For example 2023-11-03T08:00:00Z.
Reports
Consumption unit reports hold information about its usage over time. More concretely, it is values such as how much storage is used, and how much data has been transferred.
To find reports over a time interval, use this endpoint:
[GET] /v1/bunits/{bunitId}/consumers/{consumerId}/reports?startDate={startDate}&endDate={endDate}&status={true/false}&warnings={true/false}
- Response Body: NodeReportList
Use startDate and endDate to specify a time interval,
the format of their values is the same as in the Audit Log endpoint above.
Set status or warnings to true to retrieve the status of the report or
the warnings of the report respectively.
All query parameters are optional.
If you have requested node warnings, you may want to also use the following endpoint to interpret their types:
[GET] /v1/nodewarningtypes
- Response Body: NodeWarningTypeList
To find the latest report, use:
[GET] v1/bunits/{bunitId}/consumers/{consumerId}/reports/latest?userId={userId}
- Response Body: NodeReport
The userId parameter can be used to customize the report for a specific user.
It is optional.
Jobs
To retrieve information about jobs (e.g., restore or backup jobs) against a backup node, you have to first get retrieve the very first job. We will explain why later. Use this endpoint to get the first job:
[GET] /v1/bunits/{bunit_id}/consumers/{consumer_id}/jobs/first
- Response Body: Job
Warning
Do not use /v1/bunits/{bunit_id}/consumers/{consumer_id}/jobs/first for
anything other than getting the first job date.
Many fields returned by this endpoint will have bogus values
(0, 0.0, empty string, etc.).
So do not rely on it for actual job status data.
The reason why we did this is that the next endpoint, which retrieves jobs at a specific time interval, is very strict about how you define the start of this interval.
[GET] /v1/bunits/{bunit_id}/consumers/{consumer_id}/jobs/first?startTime={startTime}&endTime={endTime}
- Response Body: JobList
The parameters startTime and endTime are optional.
But omitting them will only get you the jobs from the latest 24 hours.
If you use this endpoint, you probably want more control over the time interval.
To specify a custom interval, make sure that startTime is greater
than or equal to the value of the completed field of the first job.
The endTime parameter can be any date.
Backup servers
There is only one backup server that we will consider, and that is the default one.
The reason these endpoints are useful is that they give us access to all the available policy domains and client option sets, which can be used during backup node creation.
[GET] /v1/bunits/{bunit_id}/defaultserver
- Response Body: BackupServer
[GET] /v1/bunits/{bunit_id}/defaultserver/domains
- Response Body: DomainList
[GET] /v1/bunits/{bunit_id}/defaultserver/clientoptionsets
- Response Body: ClientOptionSetList
Backup node operating systems and types
When creating or modifying backup nodes, we have to specify an operating
system and node type. Therefore, it is necessary to know how to retrieve
NodeOperatingSystem and NodeType resources.
[GET] /v1/nodeoperatingsystems
- Response Body: NodeOperatingSystemList
[GET] /v1/nodeoperatingsystems/{os_id}
- Response Body: NodeOperatingSystem
[GET] /v1/nodetypes
- Response Body: NodeTypeList
[GET] /v1/nodetypes/{nodetype_id}
- Response Body: NodeType
Backup nodes
A consumption unit is mapped one-to-one with a backup node. But in the API they are treated as different resources.
Note
The reason for having consumption units and not just backup nodes, is that consumption units can technically be other services. In other words, the "consumption unit" abstraction was created to accompany other consumable services and treat them similarly. But here, they are only used as backup units.
To retrieve the backup node of a consumption unit:
[GET] /v1/bunits/{bunit_id}/consumers/{consumer_id}/node
- Response Body: Node
Creating a backup node
[POST] /v1/bunits/{bunit_id}/consumers/{consumer_id}/node
- Request Body: Node
- Response Body: Node
The request body can have the following format:
{
  "clientOptionSet": ClientOptionSet,
  "contact": string,  // Contact information
  "cpuCount": integer,
  "domain": Domain,
  "operatingSystem": NodeOperatingSystem,
  "server": BackupServer,
  "type": NodeType
}
The required resources such as the ClientOptionSet and the Domain and can
be retrieved using the endpoints above.
Editing a backup node
This endpoint is used to edit a backup node's attributes.
[PUT] /v1/bunits/{bunit_id}/consumers/{consumer_id}/node
- Request Body: Node
- Response Body: Node
To change the password of the backup node, there is this specific endpoint:
[POST] /v1/bunits/{bunit_id}/consumers/{consumer_id}/node/password
- Request Body: Node
- Response Body: Node
The request body only needs one attribute from the Node resource,
and that is tsmPassword. In other words, the request body should look like
this:
{
  "tsmPassword": "[your new password]"
}
Deleting a backup node
This will remove the entire consumption unit as well.
[DELETE] /v1/bunits/{bunit_id}/consumers/{consumer_id}/node
- Request Body: Node
Activate
To actually be able to use a backup node, it has to be activated first. This is done by using the following endpoint:
[GET] /v1/bunits/{bunit_id}/consumers/{consumer_id}/node/activate?tsmName={tsm_node_name}
- Response Body: string
Make sure to give the backup node a name by replacing the {tsm_node_name}
placeholder.
The name that you give must follow IBM Storage Protect's
object naming rules.
Because this is the name that will be used to configure the respective
computer's backup client.
Filespaces
You can use the following endpoint to manage the filespaces of a node.
[GET] /v1/bunits/{bunit_id}/consumers/{consumer_id}/node/filespaces?tsmSync={true/false}
- Response Body: FilespaceList
true will manually sync Cloutility with the backup server
before returning the filespaces.
Setting it to false will make the call faster.
Setting proxy nodes
You can allow a node to act as another node, in other words, making a node a proxy agent for a proxy target. The proxy agent can then, for example, restore the proxy target's files.
With the API, this relationship can be established from either side.
To find possible nodes to establish such a relationship with, you can use:
[GET] /v1/bunits/{bunit_id}/consumers/{consumer_id}/node/possibleproxynodes
- Response Body: NodeList
To establish a proxy relationship, you may use either one of these endpoints:
[POST] /v1/bunits/{bunit_id}/consumers/{target_consumer_id}/node/proxyagents?proxyAgentId={proxy_consumer_id}
- Request Body: Node
- Response Body: Node
[POST] /v1/bunits/{bunit_id}/consumers/{proxy_consumer_id}/node/proxytargets?proxyTargetId={target_consumer_id}
- Request Body: Node
- Response Body: Node
To severe a proxy relationship, you may use either one of these endpoints:
[DELETE] /v1/bunits/{bunit_id}/consumers/{target_consumer_id}/node/proxyagents/{proxy_consumer_id}
- Request Body: Node
[DELETE] /v1/bunits/{bunit_id}/consumers/{proxy_consumer_id}/node/proxytargets/{target_consumer_id}
- Request Body: Node
Billing Information
It is possible to retrieve information about which services a business unit is subscribed to, how much has been consumed, and how much it all costs.
Contract
This endpoint allows you to retrieve the contract that a business unit is participating in.
[GET] /v1/bunits/{bunit_id}/contract
- Response Body: Contract
Invoices
The following endpoint allows you to retrieve invoice data for a Business Unit.
[GET] /v1/bunits/{bunit_id}/invoices
- Response Body: InvoiceList
[GET] /v1/bunits/{bunit_id}/invoices/{invoice_date_str}
- Response Body: Invoice
invoice_date_str has the YYYY-MM-DD format and can be retrieved from the
Invoice.href field.
If invoices (usually PDF files) have been uploaded for a business unit to Cloutility, they can be accessed using:
[GET] /v1/bunits/{bunit_id}/invoicefiles
If you are reselling backup services to a business unit, you can upload invoices using:
[POST] /v1/bunits/{bunit_id}/invoicefiles?erpReference={erpReference}&sendToBillingAddress={sendToBillingAddress}
erpReference is an optional ERP code, used when integrating invoicing
software.
sendToBillingAddress is a boolean (can be true or false).
Billing data
If a business unit is a reseller of backup services to its children, the following endpoint allows you to retrieve the billing data.
[GET] /v1/bunits/{bunit_id}/billing?includeNext={count}
- Response Body: BillingDataList
[GET] /v1/bunits/{bunit_id}/billing/{invoice_date_str}
- Response Body: BillingData
When integrating invoicing software, it can be useful to automatically be notified when new billing data is generated, at the end of the month, for example. You can subscribe to these events by clicking on [Reseller Business Unit] -> Settings -> Billing -> Subscribers -> Add.
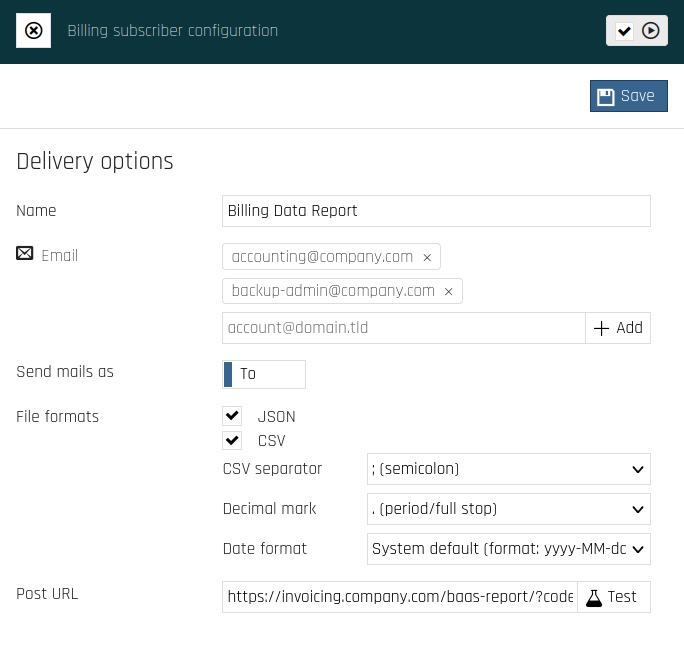
The "Post URL" field is an HTTP endpoint that you host. It should be able to process POST-requests from Cloutility that are sent every time billing data is generated. This end point must be at the very least accessible to Cloutility, and can be firewalled off from other clients.
You can click on the "Test" button next to the "Post URL" field to send a test request from Cloutility to your endpoint. The test request will look something like this:
POST /baas-report/?code=xyz HTTP/1.1
Content-Type: application/json; charset=utf-8
Host: invoicing.company.com
Content-Length: 49
Expect: 100-continue

{"trigger":"test for new billing data available"}
The header Expect: 100-continue is the HTTP client's way
(Cloutility in this case) to ask the HTTP server if it is okay to send the data.
The server should normally reply with status code 100 (continue).
HTTP/1.1 100 Continue
Your HTTP server should handle this automatically, but it is worth mentioning in case it does not do so.
Once your server has received this trigger,
it can retrieve the latest billing data by invoking /v1/bunits/{bunit_id}/billing,
as mentioned above.
Resources
To find an overview of the REST API resources, please visit this page.