Getting Started
I just got a Safespring Compute account, what now?
Start by logging into the portal. You will be greeted with an overview of the project/account statistics. It usually starts off rather empty, but as machines are added, resources will be summarized there.
- Swedish legacy site sto1 portal: https://dashboard.cloud.sunet.se
- Norwegian legacy site osl1 portal: https://login.osl1.safespring.com
Legacy sites
The old sto1 site is accessible through the SUNET dashboard at https://dashboard.cloud.sunet.se. for all users. The old osl1 site is accessible at https://login.osl1.safespring.com for all users. If you use the API at legacy sites, please refer to this documentation: https://docs.safespring.com/service/known_issues/#cloudipnettnose-domains
Virtual Machines
Openstack calls VMs "instances" so in order to start running a few machines, you go to the Instances category, and use Launch Instance(s) to get your first VM up.
When creating an instance, you get asked about if you want to create a volume, and if you answer yes to that, also if you want it deleted after deleting the instance.
It is normally not necessary to create a (new) volume for a new instance, answering No means that you will get a disk of the preferred size pre-configured for your chosen OS image. For machines with shorter lifespans (tests, validation and so on) this may be a good alternative. Disks created alongside with the OS image are sometimes referred to as 'ephemeral disks'. Regardless of if you create a volume / disk manually or not, you can always attach more disks later on.

Before we go into starting VMs, let's take a quick look at the concepts and names used in this cloud implementation.
Volumes and Images
Whenever a disk is created in Openstack, it will be a volume. A volume may be snapshotted and the snapshot may later be reused on the same instance or on other instances.
You may also add or upload "passive" disks called Images (including ISO images) that may be used to hold templates for instances or to install from, in the case of ISO images. A volume can be converted to an image, in case you prepare a machine and later want to duplicate it many times.
We supply a certain amount of public images, but you can have an own per-project list of images your project members can choose from which will not be visible to others. The public images are good starting points and may be used for generic instances, but the more specifics you add, the more reason for creating customized images where local edits can be prepared once and reused for all machines.
Also, while we try to keep the public images up-to-date when publishing them, keeping such an image patched, updated and secure falls upon you after starting the instance on it, after that point, any edits and improvements to the base image will not be reflected in your instance.
Using snapshots to freeze volumes is a useful technique for being able to back out of tests, but do mind to clean out unused snapshots when they are no longer of interest, since they count against your storage quota.
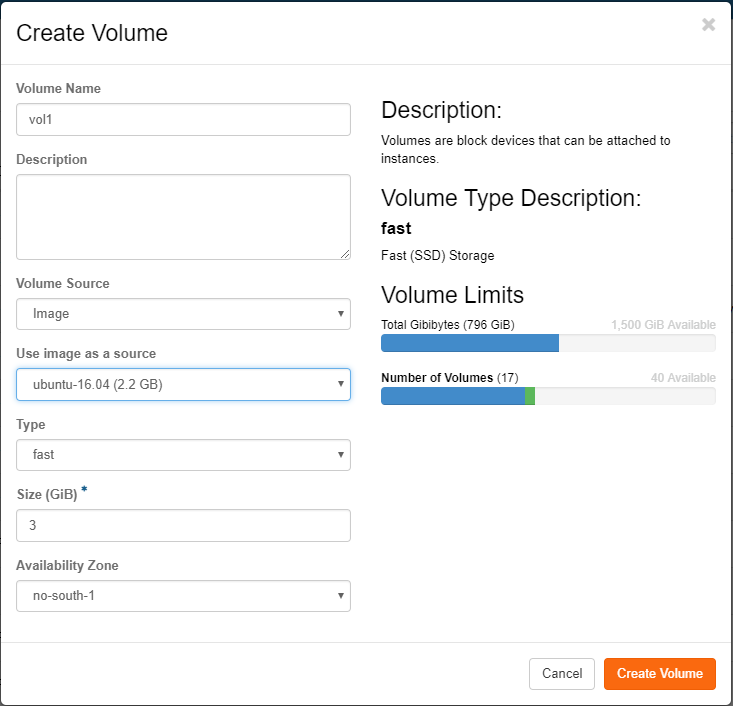
All flavors in Safesprings platform come with a 40 GB root disk. In the case you would want another size on the root disk you first create a volume under "Volumes" and pick Volume Source as Image and then pick the image that corresponds to the operating system you want to run on the instance.
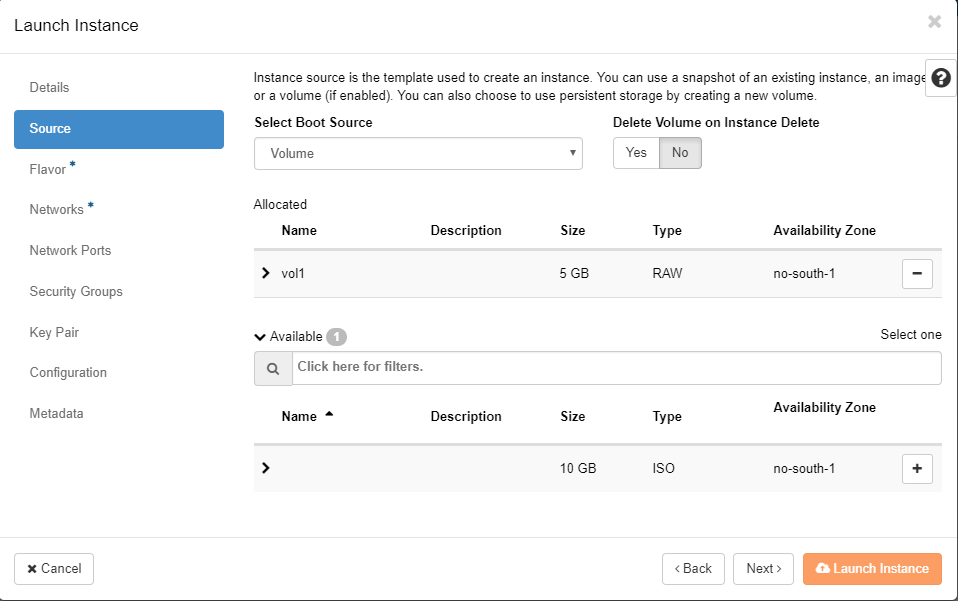
After creating the volume you head to the "Launch instance" dialogue. Under "Source" you pick "Volume" from the pick-list and then press the plus sign for the volume you created in the former step. You can also choose whether the volume should be persistent or not by switching the "Delete Volume on Instance Delete" option.
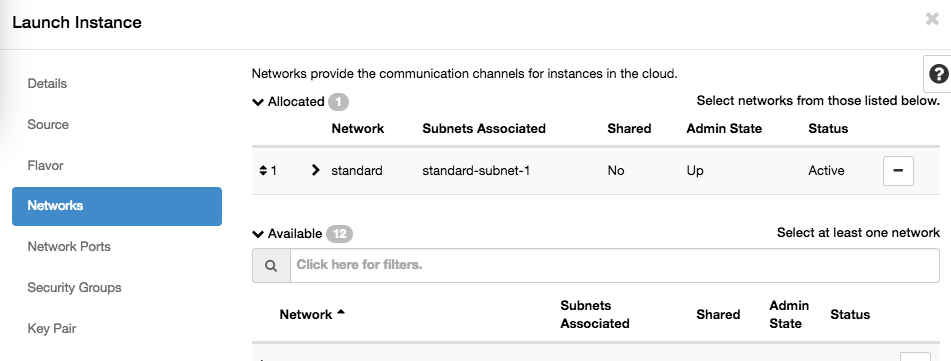
Networks
All tenants (be it test accounts or projects) need to have some kind of network made available to it. If you are testing out, there may already be a demo-network or something similar set up for your instances, otherwise you need to create a network for your machines to start in.
When starting an instance in a tenant network, it will get an internal network IP, probably set up with one of the RFC1918 IP-ranges, which means it can't be reached (yet) from the outside. It often also means that it can't reach out either. For some instances, this is exactly what is intended, but sooner or later you will need to be able to go outside of that network to get updates and/or other post-install configuration options.
In order to be able to reach out, you associate a Floating IP to your machine. Specifically, you attach it to your network interface. This means that the RFC1918 IP you got when starting up will remain. You will just get a 1:1 NAT mapping from the outside IP into your VM interface. One instance may do this and act as a proxy for many other instances on the same internal network, if your security design requires all VMs to pass through a central point.
Before going into network creation, just a short notice about..
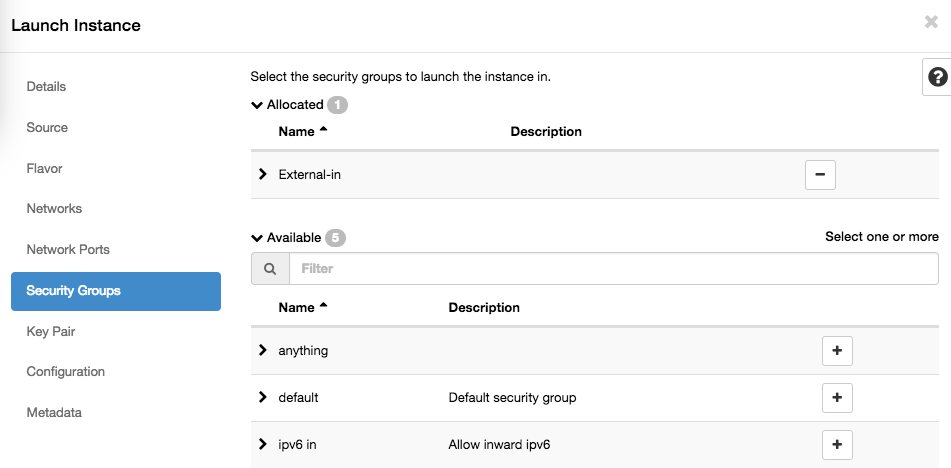
Security Groups
Security groups is the name for the basic network packet filtering option built in to the Openstack/Contrail setup in use in the Safespring cloud. Security groups allow you to create lists of rules that can be applied to instances.
One instance can have several security groups attached to them, and default is to deny everything and then each added security group would add more exceptions that would be allowed so one group may allow inbound SSH (TCP port 22) for remote administration and another group allows outgoing HTTP and HTTPS (outbound port 80,443) in order for the instance to download OS updates.
Before being able to reach outside networks, a floating IP needs to be associated with one of your network interfaces (ports), and a security group allowing this must be applied to your instance. You can create many different security groups and apply one or more to any instance you have. Applying a security group takes effect immediately on running instances. Running local firewalls is still recommended, since other machines on the same local network may still reach your instance.
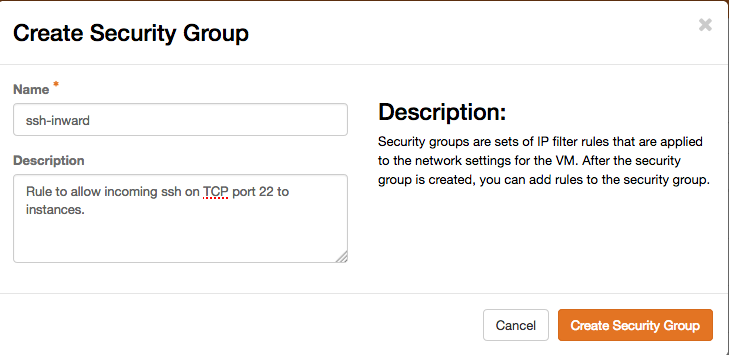
Creating your own security groups
First create a group, and give it a descriptive name. Security groups are per project, so you may name them as you like, they will not be visible to other projects.
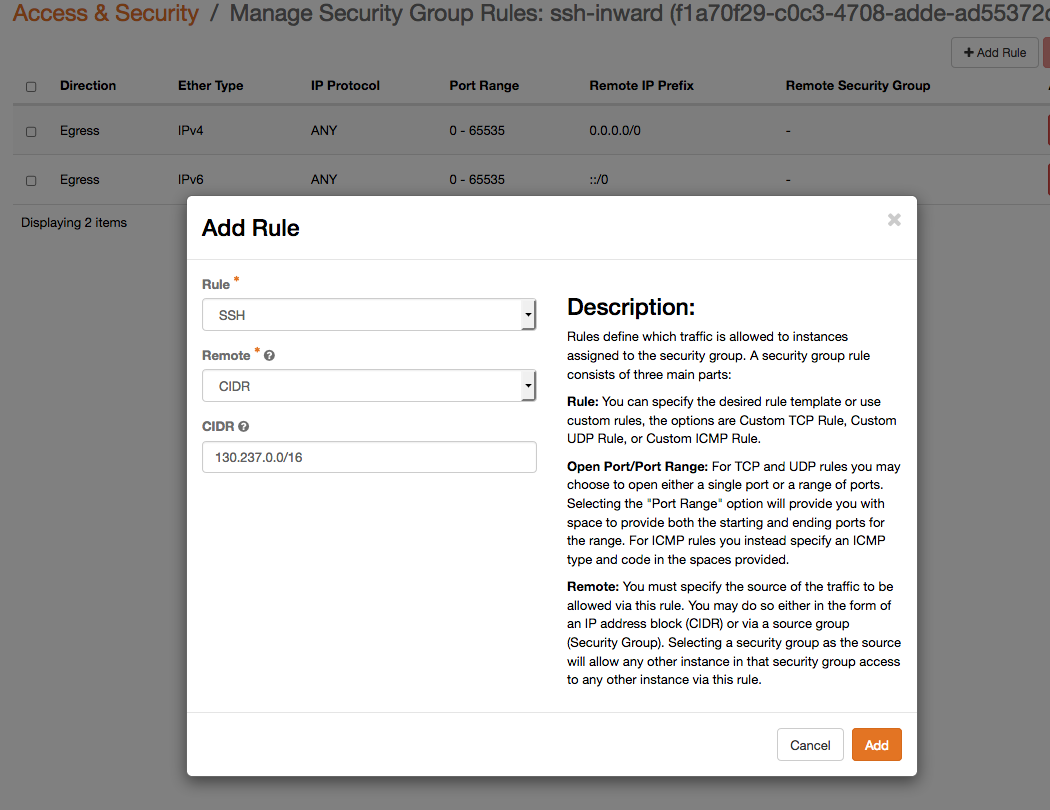
then add rules to it. Some of the common protocols have pregenerated defaults, and specifically SSH is at the bottom of the list, so it might require scrolling for it to be visible. If the program or protocol you want to open up isn't in that list, you will have to start by specifying TCP/UDP/ICMP manually and set which port(s) it uses. If you want to have it reachable from any IP, leave the CIDR field blank, even though the "?" help popup might suggest that "-1" indicates any. Otherwise, if you want to make the rule dependent on a certain source network or even a single IP, just add it with an appropriate netmask in the CIDR field.
As soon as you apply the security group to an instance, it will take effect, no restart or rebuild will be necessary. Do note that the Default ruleset usually prevents all traffic, and that new security groups you place on instances should add permissions for only those protocols you want to allow.
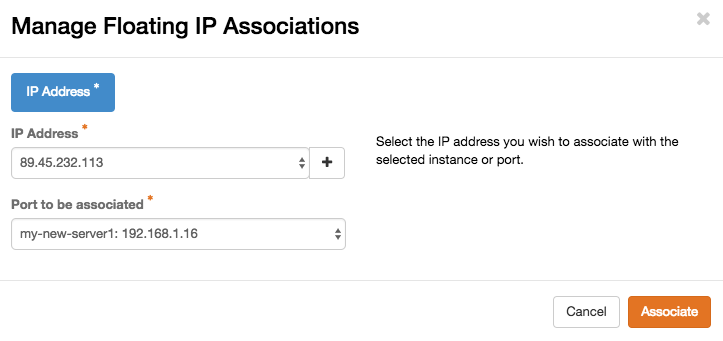
Floating IPs
Floating IPs are taken from a global pool of network addresses that we currently have allocated to the cloud services. Each instance that needs to interact directly with the outside will need to associate a floating IP. If you intend to make a VPN connection in order to stretch your home network into the cloud, the gateway machine would be the only one for which you would do this, the rest would talk to it for outside communications.
Associating a Floating IP is done when the instance exists, so you can be presented with the interface you have, and then you select one out of many free IPs. The list of IPs may at times be empty, then you just press the "+" sign next to "Select an IP address" and then select from which pool to get an IP, allocate one and go back to the previous screen again.
The drop down menu should now have an IP you can associate with your instance. If you haven't done it yet, Edit Security Groups for that instance and set filter rules appropriate for your instance.
You machine could now be reachable from the outside, rules permitting.
Cloud Init
Even though the web dashboard has the ability to show you an HTML5-based remote console interface for your instance, using SSH, remote desktop or something similar is usually preferred. The console is ok for rescue operations, but may not be comfortable enough for long time work.
In order to place customizations into your instances, most public cloud images support running something called Cloud Init at boot, which means it calls out to a web server early on first start to ask for configurations like scripts to run, software to install or users/pw to add.
Setting up a user, and/or setting up authorized_keys for SSH becomes very important when using common shared images since it would be unfortunate if it came with logins enabled and a publically known password, since it would be a matter of timing if you or someone else notices a publicly available machine first and logs in using the commonly known password. Most public images will only allow console logins, or force you to add an SSH public key and then only let you in using that key.
The Windows images and the small CirrOS linux image will have a way to force you to set a password on the console, or tell you on the console what the password is, whereas the Ubuntu cloud images already have a user named 'ubuntu' prepared, but need you to add an SSH public key via cloud-init and from that account, let you elevate privileges to root via passwordless sudo.
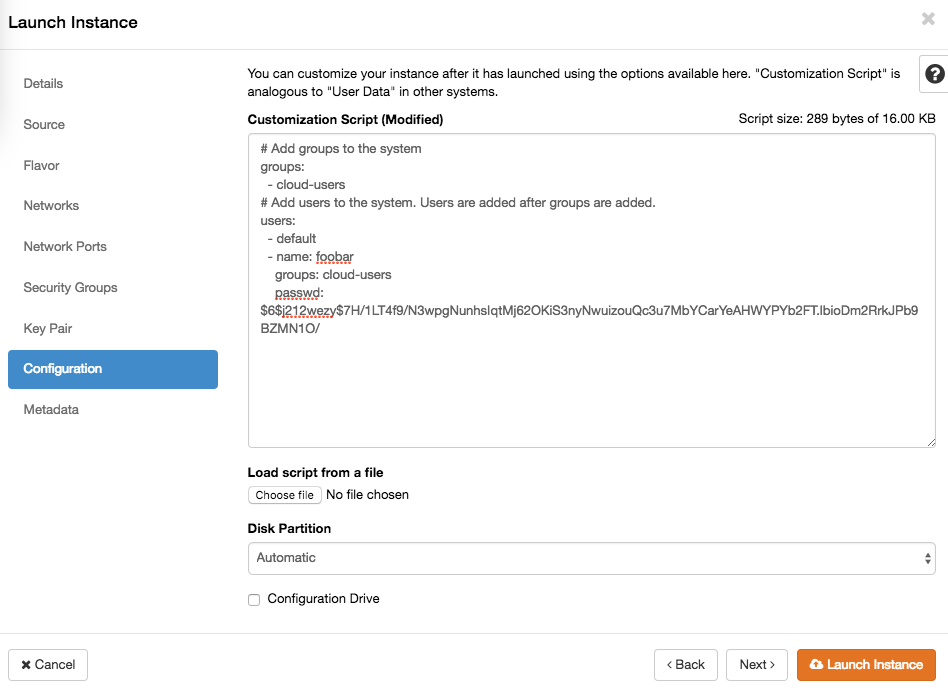
When launching an instance you can add a cloud init file up to 16k in size. That limit is somewhat arbitrary, but should be enough to either do all you want, or teach the instance where to get further instructions. In the dashboard Launch Instance wizard, this is in the Configuration step, where it's called Customization Script. You may upload a prepared file or paste it into the web form directly.
More advanced customizations can be added as a "configuration drive" which will appear as a separate disk to the guest which holds whatever data and software needed for post-install, preferably in a generic way so it can be reused for many instances. It is further possible to add per-instance specific metadata in the last step of the launch wizard, which the instance can ask for while starting up.