Complete Windows Recovery using TBMR
Restoring a complete Windows system is made easier with TBMR which provides a bootable image (akin to an Ubuntu installer ISO) that is able to recover whole systems from the TSM backup server.
To be able to perform a restoration in the future with the help of TBMR, a utility has to be installed and set up on the system while the system is functional. In other words, you need TBMR installed and configured before data has been compromised and a disaster recovery is needed.
This document will describe how to install and set up TBMR on Windows. Linux is supported as well, and can be set up in an equivalent way to how it is done on Windows. However, that will not be described here.
Prerequisites
- The client machine must be running Windows.
- The TSM Backup-Archive client (dsmc) must be installed and configured to perform a full incremental system backup. See the Quickstart Guide for information about how to do this.
- A license for TBMR. As a customer, you have access to our site license. Please contact support to receive a copy.
Installation
We will describe step by step how to install the TBMR utility on Windows client systems to make them recoverable using TBMR.
Note
These steps must be taken before data has been compromised!
-
Run SetupTBMRSuite.exe and select which components to install.
- If you have not generated a CRISP Recovery ISO before, select all options except for "CRISP WinPE5 Recovery Environment Fileset".
- If you have generated a CRISP Recovery ISO before, select only "Cristie TBMR" (the first option).
And proceed.
Note
To install TBMR + CRISP automatically; you can run the following command using the Command Prompt with administrative privileges:
This allows for automatic deployment without user interaction.SetupTBMRSuite.exe /passive /log ./tbmr.log /norestart
If you are not interested in using the machine for ISO creation, you can install TBMR without CRISP the same way using SetupTBMR.exe instead.
SetupTBMR.exe /passive /log ./tbmr.log /norestart
-
Make sure to configure the license key using the Command Prompt with administrative privileges:
Replacerd c:\ProgramData\Cristie\Licensing /s /q "c:\Program Files\Cristie\TBMR\licmgr.exe" /p tbmr /cid [CONTRACT-ID] /act [ACTIVATION-CODE]
[CONTRACT-ID]and[ACTIVATION-CODE]with the proper values. - In
C:\Program Files\Tivoli\TSM\baclient\dsm.optadd the following line:This option will runPRESCHEDULECMD '"C:\Program Files\Cristie\TBMR\TBMRcfg.exe"'
TBMRcfg.exebefore every scheduled event, such as incremental backups. It will regenerate an important folder calledC:\TBMRCFG. - The special folder created by TBMR called
C:\TBMRCFGcontains information about the OS, dsmc configurations and the hardware it is running on. It is important that it is available in the backup during a disaster recovery, so make sure to back up the system one more time to ensure thatC:\TBMRCFGis included.
Creating the Recovery ISO
We need a Recovery ISO that can be used to actually recover a complete system from the TSM backup server. This ISO can be generated once using the Cristie Recovery ISO Producer (CRISP) tool, and then reused for future recoveries. The reason why it is not downloadable through Safespring and has to be generated by you is due to licensing restrictions.
Steps
- Install Microsoft Windows Assessment and Deployment Kit (WADK). The correct version (2004) can be
downloaded from Microsoft Download Center.
Make sure to install the following feature:
- Deployment Tools
- Install the Microsoft Windows PE add-on as well.
Make sure to install the following feature:
- Windows Preinstallation Environment (Windows PE)
- Open the "Start CRISP" application.
- Select "Build WinPE10 recovery ISO/USB media for TBMR".
- Select a folder where the log file should be written.
- Select a folder where the ISO should be output to.
- Hit "Next>" twice.
- Check "Select if you wish to include PowerShell in the ISO or bootable USB media".
- Check "Select if you wish to include an SSL/TLS certificate file in the
ISO or bootable USB media." Download SafeSpring's root CA certificate, and browse
to the
SafeDC-Net-Root-CA.pemfile. - Hit "Next>" and wait until the ISO has been built.
Once you have the ISO, you can optionally burn it to a USB drive if needed. You should now be ready to use the ISO to perform full recoveries of backed-up Windows machines that have had TBMR set up.
System Recovery on Safespring Compute
This section covers the extra steps needed to recover a Windows instance running on Safespring Compute.
Step 1: Create an image
Follow the steps above to create an ISO image if you have not already done so. Similar to the pre-defined images on the Compute platform such as windows-server-2022 or ubuntu-22.04, you can upload your own images.
To upload the ISO so that you can use it on the compute platform, go to Compute -> Images and click on "Create Image." Then:
- Specify a descriptive name, such as
tbmr-x.y.z. - Choose the ISO as the image file.
- Select Format as ISO.
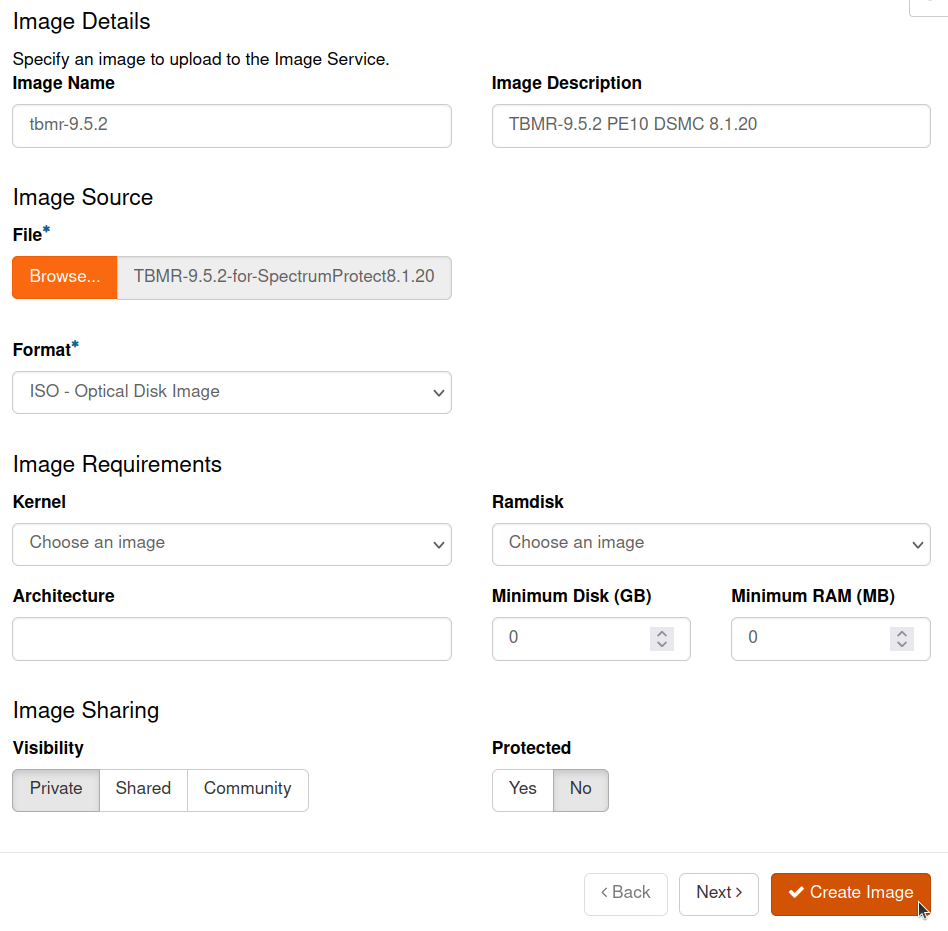
You may optionally change other settings if you would like to further customize the image.
Once done, hit "Create Image."
Step 2: Create a volume to restore to
You need a new volume to restore the system to. It should be at least the same size as that of the original system.
Go to Volumes -> Volumes, and click on "Create Volume." Then:
- Specify a descriptive "Volume Name."
- Keep the "Volume Source" as "No source, empty volume."
- The "Size" should be at least the same or larger than the original boot volume.
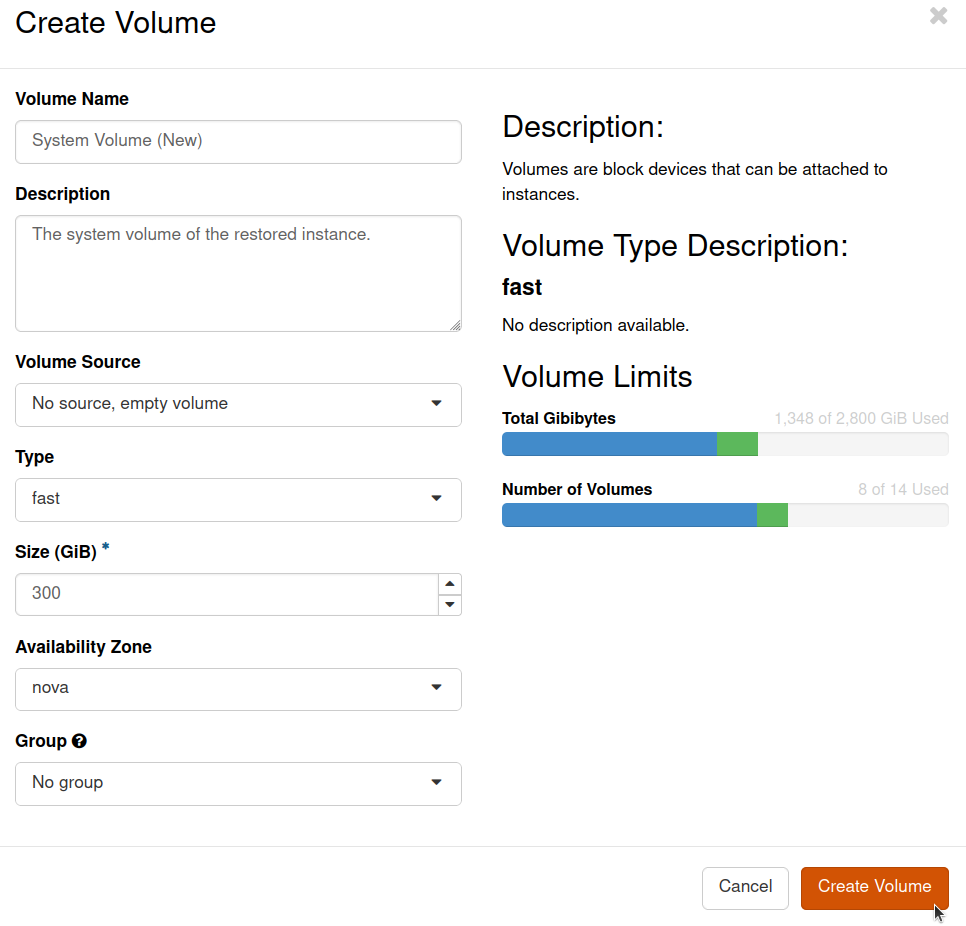
You may optionally change other settings if you would like to further customize the volume.
Once done, hit "Create Volume."
Click on "Edit Volume" next to the newly created volume, and make sure that the "Bootable" checkbox is ticked.
Step 3: Create a TBMR instance
To use the ISO image, you must create a compute instance for TBMR. This is not the instance for the system to be restored, rather it is for TBMR only. It can be safely discarded once the restoration is complete.
Go to Compute -> Instances and click on "Launch Instance."
- Specify a descriptive "Instance Name", such as
TBMR.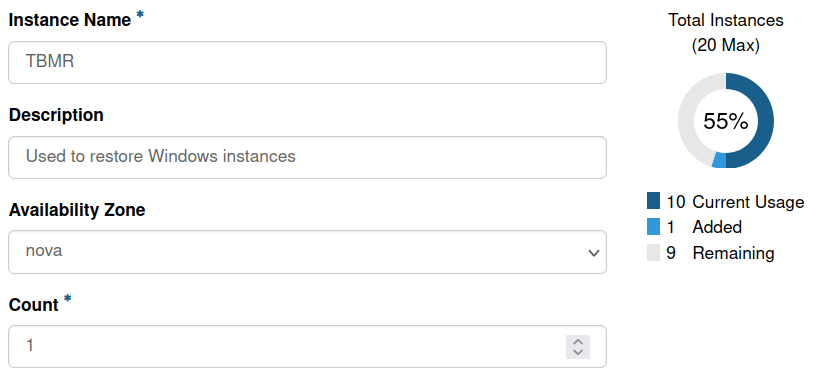
- Click "Next >", then choose "Image" under "Select Boot Source."
Choose the TBMR image that you have created on "Step 1" by clicking on the
arrow next to it.
This will move it to the "Allocated" list.
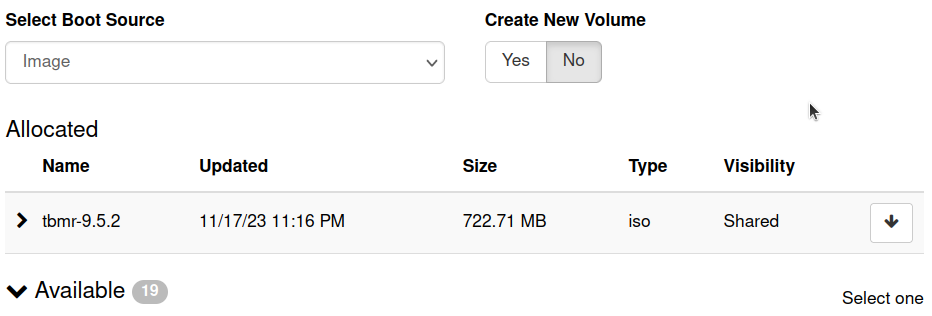
- Click "Next >".
Then select an instance flavor that has storage allocated to
it, such as
l2.c4r8.100, by clicking the arrow next to it. You will not need more than 100GB because this space will only be used by the TBMR ISO and not the system to be recovered.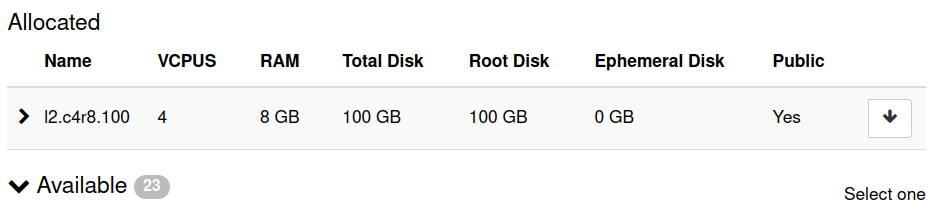
- Click "Next >".
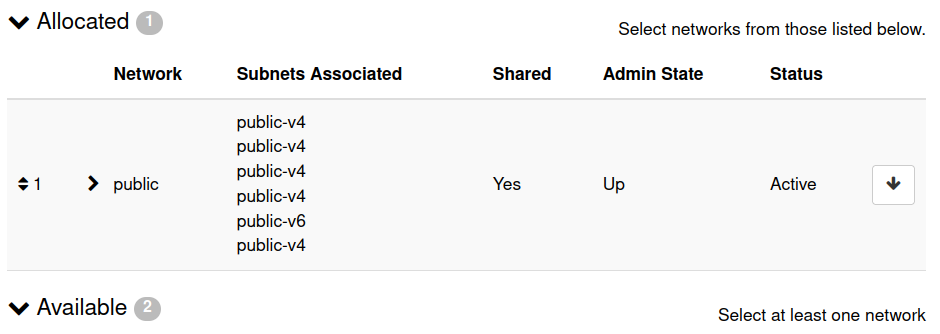
Select either public or default.
- Click on "Launch Instance."
- Once the instance has been launched, on the "Actions" column, click on the arrow and then "Attach Volume." Select the volume from "Step 2" and attach it. This is the volume that the system will be recovered to.
Step 4: Perform the system recovery
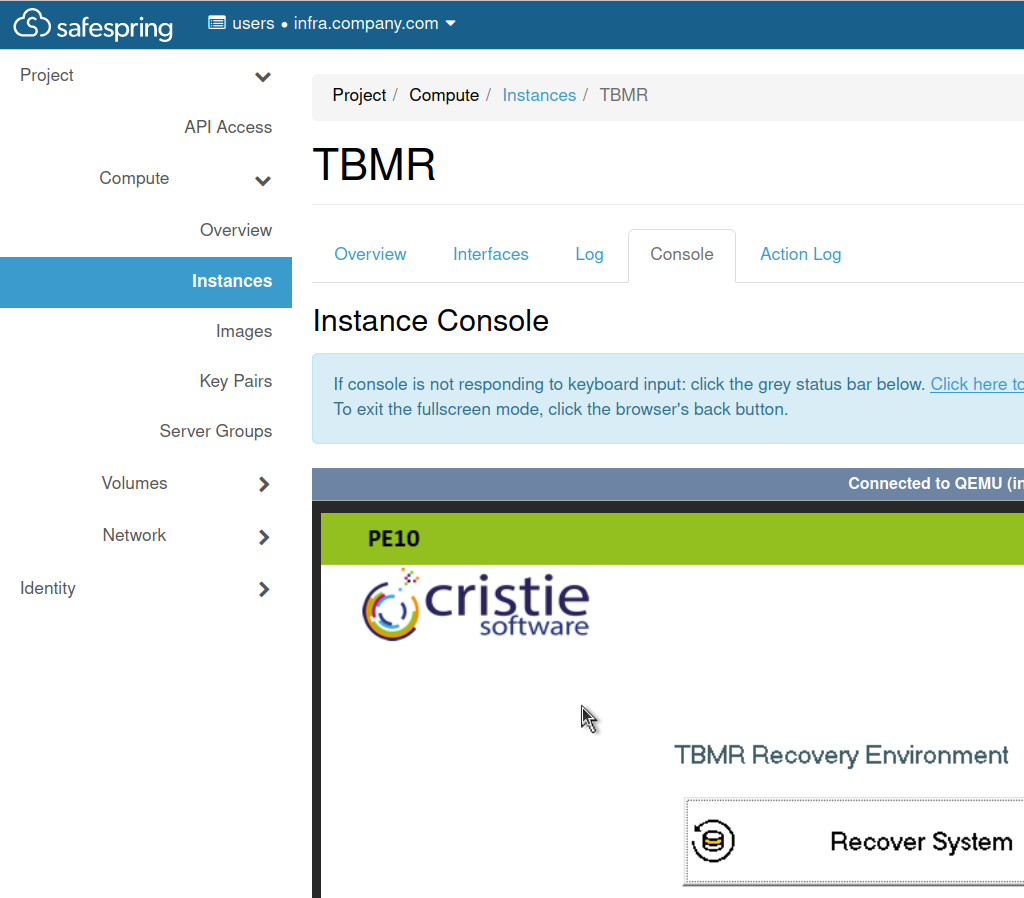
At this point, you should have everything ready to perform the system recovery. The most secure way to interface with TBMR on the Safespring Compute platform is to use the Console (a web-based VNC client). It can be accessed from Compute -> Instances -> [Your TBMR instance] -> Console.
Perform all the obligatory steps described in the System Recovery section below as you would on any other machine.
Once done, go to Compute -> Instances and click on the arrow next to the TBMR instance, and click on "Detach Volume." Select the restored volume, and detach it. Proceed to Step 5.
Step 5: Create an instance for the recovered system
With the recovered drive, you are ready to create the compute instance for the recovered drive.
Make sure to:
- When creating the instance, choose a flavor without any storage.
- In the "Source" section, set "Select Boot Source" to "Volume" and "Delete Volume on Instance Delete" to "No." Next, select the recovered volume.
Once you have configured everything, you can launch the instance and test it to see if it has booted up and is functional.
If everything worked correctly, you may delete the TBMR instance. The TBMR image can be kept around for future use if you want, or be discarded as well.
System Recovery
- Boot the Recovery ISO. If it was booted successfully, you should see several buttons including "Recover System", "Tools", etc.
- Click on "Recover System".
- Optionally, you can select a location to save logs to. This can be useful for debugging potential errors. If you have a USB stick, or a volume connected to the node, you can save the logs there.
- Hit "Next >" three times.
-
Fill in the following fields:
- Server Name/IP Address: server2.backup.dco1.safedc.net
- Port: 1600
- Node Name: [Name of the Node to recover from]
- Password: [Node password, can be found/set in Cloutility]
- (Optional) Point-in-time (PIT) restore: [which point in time to restore from] When not setting this option, TBMR will restore from the latest backup.
- Next, you will be asked to specify the volume layout. A proposed one will
initially be provided to you, but you should definitely make sure that it
looks like the way you want it.
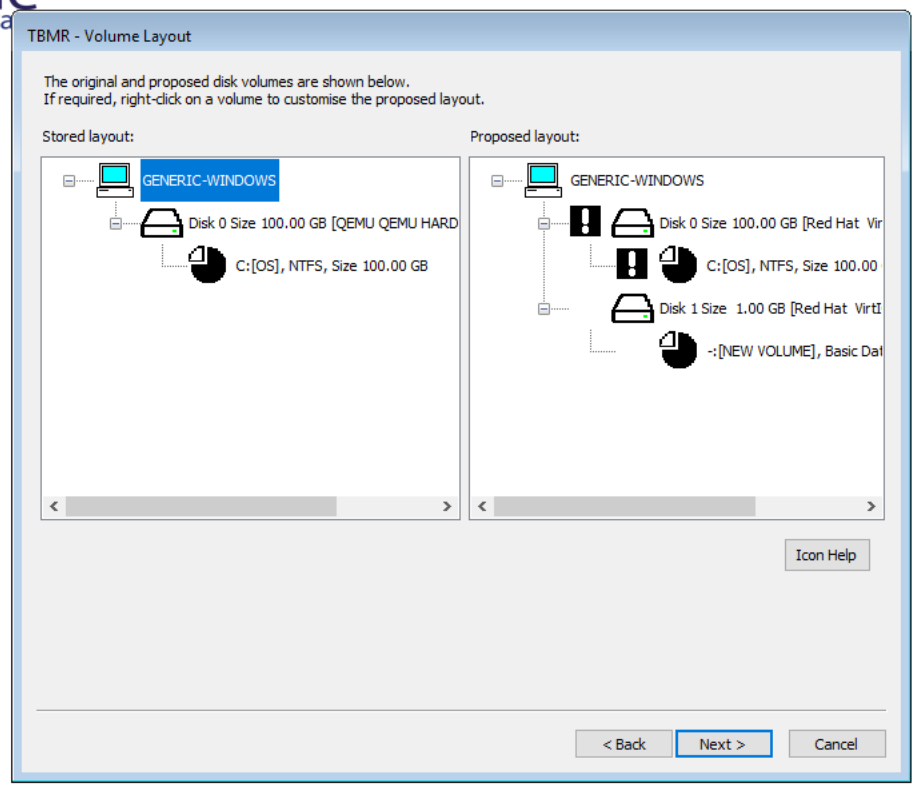 On the left-hand side you can see the current volumes. On the right, you
have the proposed layout. An exclamation mark (!) means that the object
will be formatted/partitioned. If it is blank where the (!) should be, then
it means the object will be ignored. Right-click the disks and partitions
to specify the desired layout.
On the left-hand side you can see the current volumes. On the right, you
have the proposed layout. An exclamation mark (!) means that the object
will be formatted/partitioned. If it is blank where the (!) should be, then
it means the object will be ignored. Right-click the disks and partitions
to specify the desired layout.
-
Hit "Next >". Select the drive(s) to restore.
- Hit "Next >". Optionally, set network settings and machine host name.
- Hit "Next >". Optionally, specify the location of additional network or storage drivers. If any additional drivers are needed, they can be provided using a USB stick or a virtual volume, for example.
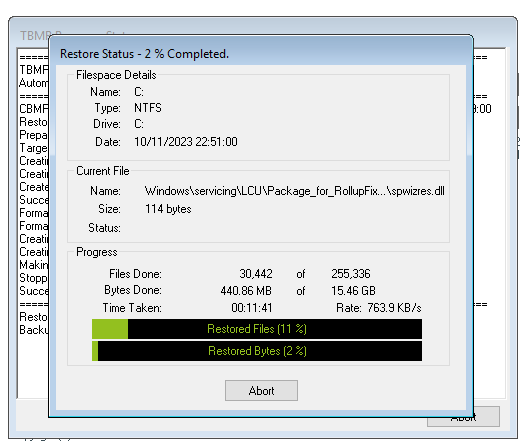
- Hit "Finish" and wait for the system to be recovered.
- Once done, boot into the recovered drive. You should see a carbon-copy of the backed-up system.