SSH key pairs
A key pair is required to connect to an instance over SSH. You can either generate a key pair locally and import the public key, or let OpenStack generate one for you.
Generating the key pair locally is recommended — the private key never leaves your machine.
Generate a key pair locally
Linux and macOS
Use ssh-keygen to generate a key pair:
ssh-keygen -t rsa -b 4096 -C "your_email@example.com"
You will be prompted for a file location (the default ~/.ssh/id_rsa is fine) and an optional passphrase. Using a passphrase is recommended — it protects the private key if your machine is compromised.
This creates two files:
~/.ssh/id_rsa— your private key. Keep this secure and never share it.~/.ssh/id_rsa.pub— your public key. This is what you import into the dashboard.
Windows
On Windows 10 and later, ssh-keygen is available in PowerShell:
ssh-keygen -t rsa -b 4096 -C "your_email@example.com"
The key pair is saved to C:\Users\<username>\.ssh\ by default.
If you prefer to use PuTTY:
- Open PuTTYgen.
- Select RSA as the key type and set the number of bits to 4096.
- Click Generate and move the mouse over the blank area to generate randomness.
- Set a passphrase in the Key passphrase fields.
- Click Save private key and save the
.ppkfile to a secure location. - Copy the public key text from the text field at the top of the PuTTYgen window — you will need this when importing into the dashboard.
Import your public key into the dashboard
In the Horizon dashboard, go to Compute → Key Pairs and click Import Public Key.
Give the key pair a name and paste the contents of your public key file:
- Linux/macOS: paste the contents of
~/.ssh/id_rsa.pub - Windows (ssh-keygen): paste the contents of
C:\Users\<username>\.ssh\id_rsa.pub - Windows (PuTTYgen): paste the public key text from the top of the PuTTYgen window
Generate a key pair in the dashboard
Alternatively, go to Compute → Key Pairs and click Create Key Pair. Give it a name and click Create Key Pair. The browser will download the private key as a .pem file — save it securely, as it cannot be retrieved again.
- Linux/macOS: use the
.pemfile directly with the-iflag:ssh -i ~/Downloads/my-key.pem ubuntu@<ip-address> - Windows (PuTTY): convert the
.pemfile to PuTTY's.ppkformat using PuTTYgen: go to File → Load private key, select **All files (.)** and open the.pemfile, then click Save private key.
Connect to an instance
Linux and macOS
ssh -i ~/.ssh/id_rsa ubuntu@<ip-address>
If you are using the default key (~/.ssh/id_rsa) it is picked up automatically and the -i flag can be omitted.
Windows (OpenSSH)
ssh ubuntu@<ip-address>
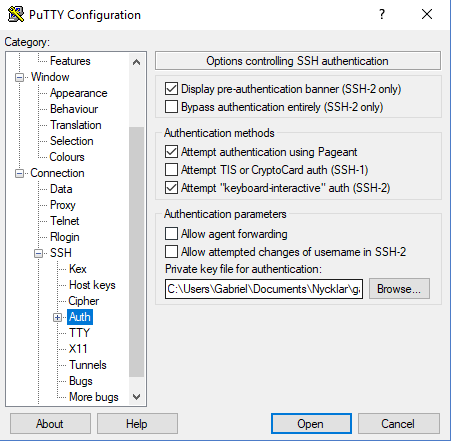
Windows (PuTTY)
- Open PuTTY and enter the instance IP address under Session → Host Name.
- Go to Connection → SSH → Auth → Credentials and browse to your
.ppkfile under Private key file for authentication. - Click Open to connect.
Default username
The default SSH username depends on the image: ubuntu for Ubuntu, debian for Debian, almalinux for AlmaLinux, rocky for Rocky Linux, and cirros for CirrOS. The root user is typically disabled.